"Specialists in American Flyer Trains & S-Gauge Railroading"
888-708-0782 (from US only)
978-465-8798 (International)
Phone calls: 2-5 PM Eastern
Time, Tue-Thu only

AM. FLYER REPAIR CLINICS
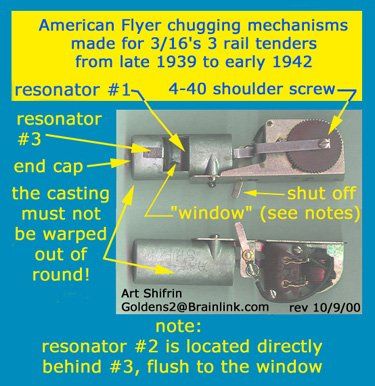
CLINIC # 8: Servicing The American Flyer Chugging Tender Mechanisms
It’s my experience that most don't properly operate and that about 1/2 cannot be made to do so. The fatal problem is warping of the casting to an extent that's sufficiently out of round so that the washer on the piston cannot have intimate contact with the inside of the cylinder.
BEFORE PROCEEDING, CLEAN THE MOTOR’S ARMATURE AND BRUSHES
Usually, these are so minimally worn that they don't have to be replaced.
THE SPECIALIZED MECHANICAL PROBLEMS THAT CAN BE CORRECTED ARE:
insufficient contact of the washer with the cylinder & missing or loose resonator elements
CLEAN THE MOTOR’S ARMATURE AND BRUSHES
Usually, these are so minimally worn that they don't have to be replaced.
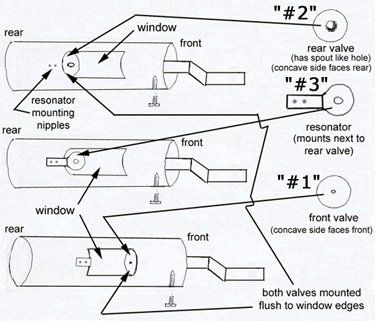
CHECK THAT ALL 3 VALVE ELEMENTS ARE PRESENT WITHIN THE CHAMBER AND NOT LOOSE
These are:
1) a bent-edged washer with a center hole that’s about 1/32" dia. This is located on the piston side of the window in the casting. It is supposed to be flush to the window edge. Even if it seems to be tight, I recommend applying a seal (I use 5 minute epoxy) around the seam of the washer and inside of the chamber (clean the metal with a solvent prior to applying the seal). This assures that the air passes only through the hole, as it’s supposed to.
2) another bent-edged washer that’s located on the opposite side of the window. This has a punched hole that’s about 3/16" dia. The seam of this too, should be sealed.
3) a "flapper" that’s attached by two piened nipples on the outside of the chamber, is bent almost 90 degrees and extends into the window on the side of element #2. Due to even minor "metal rot", these nipples are often weak & the element either loose, fully detached or missing. If present, re-secure it with epoxy. When positioned properly, the round portion of this element is NOT supposed to be perfectly parallel to element #2. It should be bent slightly towards element #1 (about 3/32s inch away from element #2 & endash; measured at the side.
opposite the 90 degree bend.
WASHER CONTACT PROBLEMS: EASIER, LESS AGGRESSIVE METHOD
Dismantle the assembly so that the diecast chamber is detached from the motor and clean out the cylinder with a solvent such as isopropyl alcohol, paint thinner, NAPHTHA or lacquer thinner
Thoroughly clean the accessible portions of the leather washer with paint thinner OR NAPHTHA BUT not alcohol or lacquer thinner.
Exercise the edge of the washer: bend it repeatedly back away from the bent flange, then apply plastic-safe oil to both edges, bend the edges back against the tapered washer and work the washer and its plunger back into the cylinder (remember, the leather mustn’t be bent over itself when finally located in the cylinder).
Reattach the casting to the chugger base with the two 4-40 mounting screws. DO NOT TIGHTEN the screws because the casting can easily crack around the tapped holes.
TEST IT, (REMEMBER THAT THE LEVER BELOW IS A SHUT-OFF). If it does not yet chug, then proceed to the next method
WASHER CONTACT PROBLEMS: MORE AGGRESSIVE METHOD
Perform the above procedures, but pop the rivet that fastens the washer and remount the leather facing opposite its original direction. This results in tighter contact between the washer and chamber because the material is now counter-biased.
The rivet can be replaced with a 6-32 machine screw IF it is secured with a lock washer AND setting substance, such as "Loc-tite" or paint.
RECOMMENDED NON DESTRUCTIVE WIRING MOD
This incapacitates the chugger when the loco’s in neutral. This makes its illusion much more realistic.

Your purchase is secure
Satisfaction guaranteed
International shipping
HOME
6 Storeybrooke Drive
Newburyport, MA 01950-3408
Email Doug
888-708-0782 (from US only)
978-465-8798 (International)
Phone calls: 2-5 PM Eastern
Time, Tue-Thu only
Website & Hosting by SovoWeb a division of RedXWebDesign