"Specialists in American Flyer Trains & S-Gauge Railroading"
888-708-0782 (from US only)
978-465-8798 (International)
Phone calls: 2-5 PM Eastern
Time, Tue-Thu only

AM. FLYER REPAIR CLINICS
CLINIC # 34: REBUILDING DIESEL POWER-TRUCKS
Sloppy axles not only cause poor operation, but will eventually burn out a motor!
IDENTIFYING A WORN CHASSIS:
Turn the chassis, or even the entire engine, upside down in your hand. Grasp a pair of wheels (one axle) on the powered truck between your thumb and forefinger.
Attempt to wiggle that axle up and down, in the vertical plane. There should be very little play when you do so. Excessive play is an indication of a worn chassis that requires re-bushing.
Repeat this inspection with each powered axle.
THE CAUSE:
After extensive use, the spinning axle has worn the top of the axle hole in the chassis, creating an oblong hole instead of a round one. This causes too much pressure and friction between the axle gear and the worm gear on the armature shaft. In turn, this will overheat the motor. The engine will run poorly, will not pull well, and will ultimately burn out the motor.
THE SOLUTION:
Your engine should not continue to be operated in this condition. Re-bushing of the chassis is essential.
The earliest Gilbert AF diesels (e.g, the 360 Santa Fe) had factory bushings for all powered axles. These are a circular metal insert with a "key" on the top edge.
These engines can be easily rebushed by almost anyone, using just a set of four new bushing inserts.
Later, Gilbert eliminated the factory bushings, presumably to save money, and simply milled holes through the chassis, through which the axle was inserted.
Rebushing a later chassis is not as simple, as it requires drilling or milling of the axle hole...... if this is not perfectly placed, the chassis can be damaged beyond repair.
We do not recommend doing this with a drill press, even with an appropriate "jig", unless you have ample prior experience doing so.
The process is best done with a mill, ensuring absolute placement of the hole for the new bushings. We can provide this service.
DISASSEMBLY:
Remove the power truck from the engine, and the entire motor from the power chassis.. For our purposes, we will assume that you know how to do all of this, so we won't detail it here.
Pull all 4 wheels. Doing this by the "screwdriver method" is not recommended; you can easily chip a wheel and/or bend an axle. We highly advise use of a quality wheel puller.
Two of the four wheels have nylon insulators between the wheel and the axle. These may pull off with the wheel, or they may be left behind.
In any case, they need to be pried off also….carefully, because the old ones easily chip or break. If that happens, they need to be replaced.
The axle can then be driven out of the truck, but only in one direction! One end of the axle is wider than the other end, so it has to be driven out through the gear and through the larger hole in the truck.
I just do this carefully on top of a vise, using a hammer and a wide nail-set.
(NOTE: the larger hole is on the side of the truck having the NON-insulated wheels.)
REMOVING WORN FACTORY BUSHINGS:
This is easily done with a small nail-set, and a hammer.
Set the chassis on its side, atop a vise. Open the vise jaws just slightly wider than the factory bushing, so that the bushing can be punched downward between the open jaws.
Use the nail-set to carefully punch the old bushing out of the chassis, from the inside outward. This is a little awkward to do, but it is not difficult. Repeat for all four bushings.
RE-BUSHING THE CHASSIS:
We will describe the process of inserting new bushings into an early chassis with factory bushings, or into a later chassis that has already been milled.
Clean everything thoroughly of old grease and crud.
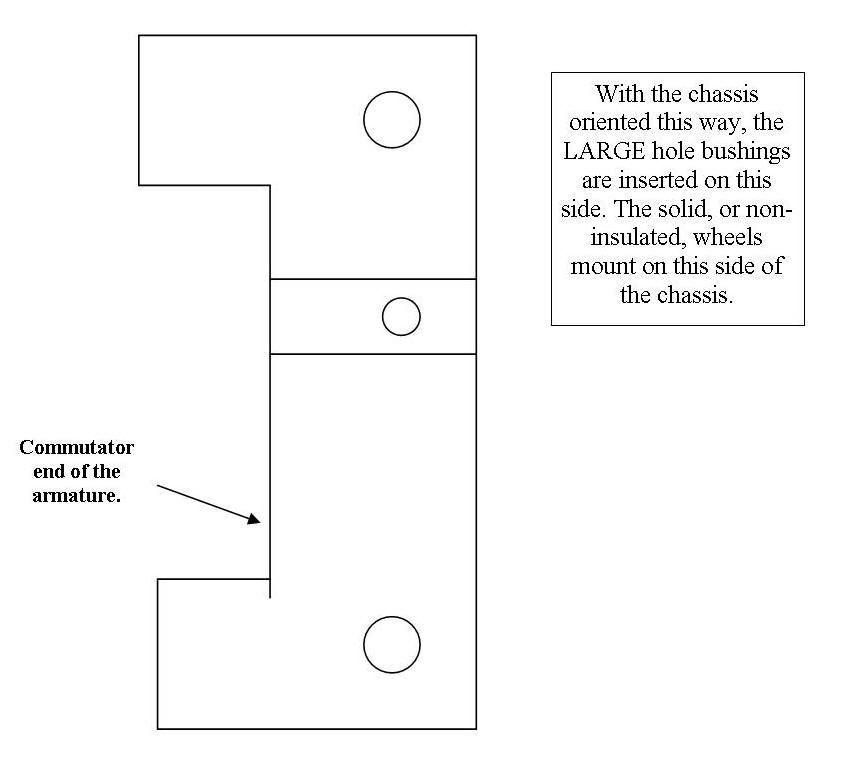
The replacement bushing kit includes two small-hole bushings, and two large-hole bushings. The axles in the AF diesel chassis are “stepped”, meaning one end has a larger diameter than the other end. Thus, the bushings that the axles passes though have two different internal diameters.
Be sure the small-hole bushings are inserted on the side of the chassis for the insulated wheels. Large-hole bushings must be mounted on the non-insulated side.
Spread a tiny drop of superglue (or red LocTite) around the inside of the chassis opening with a toothpick. Carefully tap or press the proper bushing into place. Wipe off any excess glue or Loctite liquid from all surfaces.
RE-ASSEMBLY:
Not absolutely required, but I suggest running a #14 drill and a #19 drill through the mounted bushings before inserting the axles. This ensures that the holes are the proper diameter for the axle, and that the axle will turn freely, once inserted. The #14 drill is used on the large-hole bushing, and the #19 on the small-hole bushing.
After an hour or so of setup time, axles can be safely pressed through the bushings and the axle gear. A little oil on axle and gear is advisable, for easier assembly. Check first to be sure that the axles do not have severely worn splines to secure the gear in place in the middle. If bad, replace the axle. Also, be sure the gear is not overly worn or cupped.
Insert thinner end of axle through larger hole in truck. Line it up with gear.
On top of vise, tap the axle on through the gear and out through the smaller hole in truck.
It is important to center the gear on the axle, centered within the gear opening…..easily done by eye, but important.
Repeat for 2nd axle.
Now just tap or press the two wheels (use a little oil on each axle end) back onto the axle.
The insulated wheel goes on the narrow end of the axle. The non-insulated wheel goes on the wider end of the axle.
Wheels should be pressed on equally. Again, check that the gears are centered in the openings.
When centered and gapped correctly, the gap (“wheel gauge”) is the diameter of a dime (I actually use a dime for all wheel gauging; it should drop freely between the wheel backs, with almost no “slop”).
Be sure there is a small fiber thrust plate inserted in the small indentation at each end of the chassis, where the armature ends are located. This limits the end-to-end play of the armature.
Both axles should spin freely in the truck, before re-mounting the motor.
PARTS AVAILABILITY: You should be able to locate all parts referenced in this clinic in our online
AF PARTS CATALOG.
Your purchase is secure
Satisfaction guaranteed
International shipping
HOME
6 Storeybrooke Drive
Newburyport, MA 01950-3408
Email Doug
888-708-0782 (from US only)
978-465-8798 (International)
Phone calls: 2-5 PM Eastern
Time, Tue-Thu only
Website & Hosting by SovoWeb a division of RedXWebDesign